Writing Maintainable Tests in React using the React Testing Library.

Developer and Technical Writer who enjoys building with JavaScript, Go, and modern frameworks. I write clear, hands-on tutorials to make complex tech simple.
If you want to be sure that your components are functioning correctly for your users, you should build maintainable tests. You want to avoid putting implementation details in your tests as part of this objective so that refactoring of your components—changes to implementation but not functionality—won't invalidate them and slow you and your team down.
In this article, I will show you what software testing is all about, the different types of tests you will encounter when writing tests for your react application and how to write maintainable tests using the React testing library.
What is Software Testing?
Business-critical software is tested for accuracy, performance, and quality as part of the organizational process of software development. Software testing is performed to make sure that expected product features and business systems operate as intended.
Software testing can be carried out either manually or automatically.
A team or individual who will manually operate a software product and make sure it operates as intended is in charge of manual software testing. Manual testing is done in person, by clicking through the application or by interacting with the software and APIs with the appropriate tooling. Automated software testing is carried out using a variety of technologies with a range of functions, from isolated code correctness checks to full-fledged simulations of manual testing conducted by humans.
Different types of Software Testing
You can use a variety of software testing approaches to make sure that modifications to your code function as intended.
Unit Testing
Unit tests are basic and carried out near an application's source code. They entail testing each class, component, or module used by your software's distinct methods and functions.
In React, Unit testing is done by testing if a particular component has been rendered into the UI.
Integration Testing
Integration tests ensure that the various components or services used by your application function properly. For instance, it could involve testing database interactions or ensuring that microservices interact as intended.
In React, Integration testing is done by testing the interactions between different components
Functional Testing
The business requirements of an application are the main focus of functional tests. They don't check the system's intermediate states while carrying out an action; they only check the action's outcome.
Because both require a number of components to interact with one another, integration tests and functional tests are occasionally confused.
End-to-end Testing
End-to-end testing simulates user behaviour using the software in the whole context of an application. It checks that different user flows function as intended and can be as straightforward as loading a webpage or login in or somewhat more complicated scenarios checking email notifications, online payments, etc.
Acceptance Testing
Acceptance tests are official testing that determines whether a system complies with business needs. They concentrate on reproducing user actions while executing the complete application during testing. They can, however, take a step further and assess the system's effectiveness, rejecting improvements if particular objectives are not achieved.
Performance Testing
Performance evaluations assess a system's ability to handle a specific workload. These evaluations aid in determining an application's dependability, speed, scalability, and responsiveness. For instance, a performance test can monitor response times when a large number of requests are being processed or can assess how a system responds to a sizable amount of data. It may assess whether a program satisfies performance standards, find bottlenecks, gauge stability during high traffic, and do much more.
Smoke Testing
Smoke tests are simple tests that examine an application's fundamental operation. They are designed to be quickly carried out, and their purpose is to provide you with the confidence that the main system components are functioning as planned.
Why You Should Write Tests for your code in React
- Spot ambiguities early.
- Write better and more efficient code.
- Easier debugging.
- Saves time.
Automated Tests in React using the React Testing Library
The React Testing Library is a very lightweight solution for testing React components. It provides light utility functions on top of react-domand react-dom/test-utils, in a way that encourages better testing practices. Its primary guiding principle is:
The more your tests resemble the way your software is used, the more confidence they can give you.
Your tests will therefore deal with actual DOM nodes rather than instances of rendered React components. The features this library offers make it easier to query the DOM in a user-like manner.
Projects created with
Create React Apphave out-of-the-box support for React Testing Library. If that is not the case, you can add it vianpmlike so:
npm install --save-dev @testing-library/react
React Testing Library works with the following:
- Queries.
- Matchers.
- User Action(Fire Event ).
Queries
The techniques Testing Library provides for locating elements on the page are queries. There are different types of queries ("get," "find," and "query"); the distinction is whether the query will throw an error or return a Promise and retry if no element is found. Different searches might be more or less relevant depending on the content of the page you are choosing.
The queries returned from render in React Testing Library are the same as DOM Testing Libraryexcept they have the first argument bound to the document, so instead of getByText(node, 'text')you do getByText('text')
Types of Queries
- Single elements:
getBy..., findBy..., queryBy...
- Multiple elements:
getAllBy..., findAllBy..., queryAllBy...

The suffixes for all the above-mentioned are:
RoleLabelTextPlaceholderTextTextDisplayValueAltTextTitleTestId
Custom Jest Matcher
The @testing-library/jest-dom library provides a set of custom jest matcher that you can use to extend jest. These will make your tests more declarative, and clear to read and maintain.
Some of the popular matcher used are:
toBeInTheDocumenttoBeVisibletoBetoHaveClasstoHaveTextContent
More matcher can be found here
User Action(Fire Event)
Fire Event in the react testing library is similar to event listeners used in DOM manipulation, it gives access to various events such as OnChange, onClick e.t.c
Fire Event takes two parameters:
- element: That is the element you want to trigger an event on
- target: When an event is dispatched on an element, the event has the subjected element on a property called
target. As a convenience, if you provide atargetproperty in theeventProperties(second argument), then those properties will be assigned to the node which is receiving the event.
Unit Testing Using the React Testing Library
Below is an example of unit testing for a header component in a Todo application.
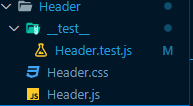
To write a test for a component in React create a folder named __test__ after that add .test.js to the name of the file you want to create.
In the code below, render and screen are being imported from the @testing-library/react, the header component to be tested is also being imported.
Tests in React are written in the test/it method provided by Jest. I prefer it method as it’s shorter and easier to comprehend.
A test/it method takes in two parameters:
- Description of the test you will be writing.
- An Asynchronous function.
Within the function
- The component to be tested is rendered into the DOM.
- Next, the DOM is queried for the
headingElementwith the text "My Header" using thescreenobject imported from@testing-library/react, which has several queries, in this case, thegetByTextquery is used to select theheadingElement. - Next, an assertion is made using the assert method provided by jest.
//Unit Testing without the describe block method testing a header component
import { render, screen } from '@testing-library/react';
import Header from '../Header';

  it('should render same text passed into title prop', async () => {
        //Components to be tested are rendered into the DOM
    render(<Header title="My Header" />);
        //Query being carried out by the getByText
    const headingElement = screen.getByText(/my header/i);
        //Making use of matcher provided by jest to make an Assertion
    expect(headingElement).toBeInTheDocument();
  });
You can choose to wrap your test in a describe block or not but it is better to do that as it improves the readability of your test code.
The describe function is similar to the test method as it takes two parameters:
- A description.
- A function that will run the test.
//Unit Testing with the describe block method
import { render, screen } from '@testing-library/react';
import Header from '../Header';

//The describe method with the test being run by the function in the second parameter
describe("Header",()=>{
  it('should render same text passed into title prop', async () => {
        //Components to be tested is rendered into the DOM
    render(<Header title="My Header" />);
        //Query being carried out by the getByText
    const headingElement = screen.getByText(/my header/i);
        //Making use of matchers provided by jest to make an Assertion
    expect(headingElement).toBeInTheDocument();
  });
})
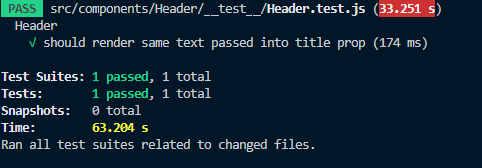
To run your test to check if it will pass or fail not cd into the correct directory containing the code you are testing for and paste the code.
npm run test
Your result will be similar to the image below if passed.
Testing Library Hooks
They are four hooks provided by the @testing-library/reactwhich you can use when writing tests :
beforeEach: This hook run before every single test.beforeAll: This hook runs once before all the tests run.afterEach: This hook run after each test.afterAll: This hook runs once only after all the tests have stopped running.
These hooks are called within the test method and they take in a single parameter which is a function.
From the code below you can see the use case of the react testing library hooks:
// Testing Library Hooks
  beforeEach(()=>{
    console.log("RUNNING BEFORE EACH TEST")
  })

  beforeAll(()=>{
    console.log("RAN ONCE BEFORE ALL TESTS")
  })

  afterEach(()=>{
    console.log("RUNNING AFTER EACH TEST")
  })

  afterAll(()=>{
    console.log("RAN ONCE AFTER ALL EACH TEST")
  })
Debugging
You may encounter errors when writing your tests, making use of screen.debug which is a convenience function for pretty-dom allows you to output your errors .
Conclusion
This article has walked you through what testing is all about, different types of tests, why you should test your code and how you should write tests for your react app using the react testing library. You learned how to make queries and assertions when testing your react app.
At this point, you are confident enough to start writing tests for your React App using the react testing library.
Reference
Software Testing in Continuous Delivery | Atlassian
React Testing Library | Testing Library (testing-library.com)


